Generating a List of Blogger Post Titles
Table of Contents
I wanted to create a Blogger page containing a list of all the posts in this blog. I was not able to find a pre-built widget to do this.
I looked at 3 options:
- Syndication feed.
- XML export file.
- Blogger API.
The API is the best fit for my needs - but it comes with a security warning, discussed below.
Syndication Feed


One approach is to embedded some JavaScript on the page, which uses the syndication feed as its data source. When I tried this, I encountered the following warnings, which prevented data from being loaded:
The syndication feed delivers data with a MIME type of application/atom+xml - so maybe that is what causes my browser to think twice. I didn’t feel to keen to investigate this any further. Maybe there is a way around the issue - but not for me, right now.
XML Export File


Just out of curiosity, I wondered what the XML export of my blog looks like - could I use that instead? This is a fairly crude way of doing things - it is certainly not a dynamic solution. I have to manually re-generate the list after adding new pages. And let’s not forget:
What is the use of an export if you cannot access its data?
So anyway, here is some Python which produces what I want:
|
|
Finally, we copy/paste the output into our static Blogger page, and re-save it.
Blogger API


The Blogger API includes a GET request for retrieving a list of posts. This requires an access token (see below for details) or an API key (assuming the data is publicly available already). If it’s not publicly available, additional authorization must be provided as part of the request.
Let’s assume it’s all publicly available data, in this case.
The API provides all its responses as JSON payloads.
I only need each blog post’s title, its publication date, and its URL. I can specify these fields in the request, as a query parameter:
fields=nextPageToken,items(title,url,published)
This significantly cuts down the size of the response - the body of the post is excluded (along with other data I don’t need).
I also need that nextPageToken field, because, by default, the API only returns 10 posts per request. So, I have to issue multiple requests to collect all my posts. I can include the following query param to increase this number, but even so, paging needs to be handled:
maxResults=50
To use the “next page” token, I have to append it to the query parameters of my subsequent API calls - for example:
pageToken=DgkIChiAxZTJ1icQ5vmT9OXn5aZU
Note - the request parameter I need to send is pageToken, (not the same as what I received, which was nextPageToken).
Each response will provide a new page token, until there are no more pages left to fetch. In my logic, I therefore check to see if the response JSON contains a nextPageToken field.
In my sample code below, I include the jQuery library, just to make things a bit easier (I am not familiar with using pure-Javascript calls for HTTP requests).
Here is the page:
|
|
By default, results are returned in reverse chronological order of publication - which is what I want, so I don’t have to sort the results before displaying them. I can explicitly control this with the following query parameter:
orderBy=published (or updated)
To get my blog ID, I just looked at the URL when editing any page - it’s one of the query parameters.
To get my Google key, I followed the getting started instructions. This gave me access to the Google developers’ console, where I can manage my Google keys.
A critically important note on the use of Google keys:
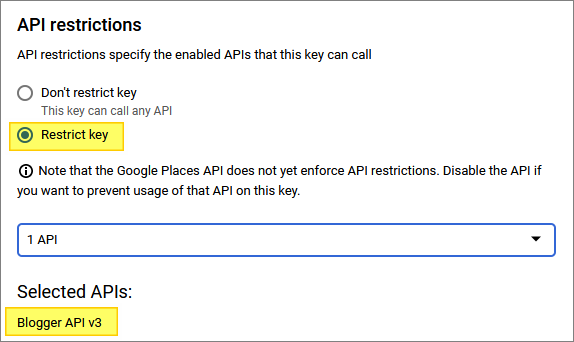
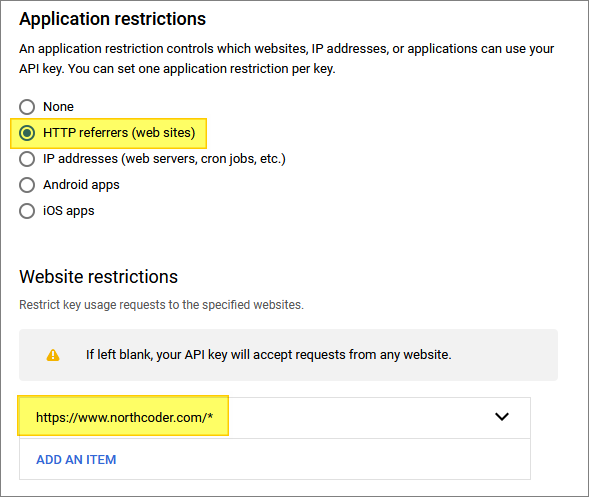
When configuring your key, be sure to lock it down, so that it only has access to:
- The specific Google API(s) that you need it to use.
- The specific URL which is allowed to use the key.
In my case, the key I am using is only enabled for the Blogger API:
And it is only enabled for one web site:
The reason for this is: your Google key is exposed publicly to anyone who cares to look at the page’s source. If you don’t lock it down, “they” (you know - Them!) may use it for their own needs - and maybe even rack up usage charges, in some circumstances.


