
Drawing Shapes on an HTML Image with a Canvas
Table of Contents
Overview


I needed to build a simple web page which would display an image and allow a user to draw simple shapes on the image, to indicate specific features shown in the image.
After capturing the locations of the shapes, I then needed to display the results back to users, and allow them to locate the marked areas via a mouse rollover and also via a list of links below the image.
This is very similar to the functionality of image maps, but without actually using <map> elements. Instead, a <canvas> is used. I have seen somewhat similar approaches using SVG shapes, but I found the canvas approach to be simpler for my needs.
There are two interactive demos:
The sources are also available on GitHub.
Creating Shapes on a Canvas
The notes in this section relate to the first demo: Canvas Drag Resize Shapes.
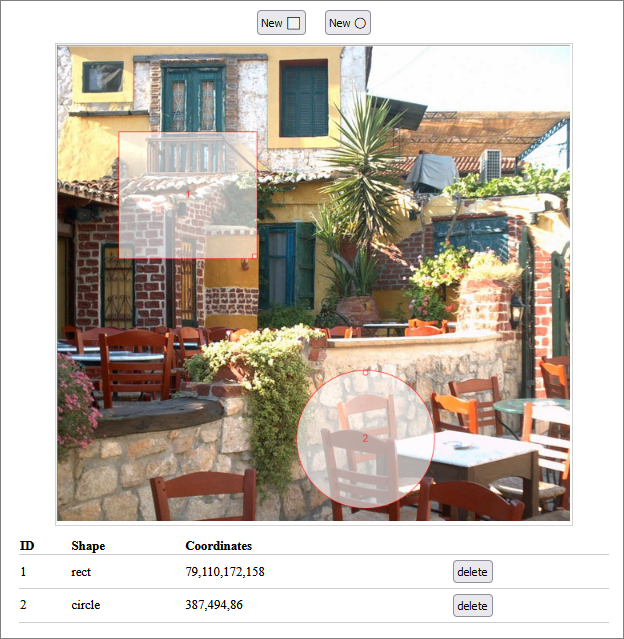
The demo allows you to create two types of shape: squares and circles. For each shape, a small handle allows the shape to be resized. Each shape can also be dragged into the required position on the image. Every shape is numbered. The numbers are displayed in a table underneath the image, along with details for the shape, including its coordinates.
An example:
Set-Up
The basic set-up involves adding a hidden image to the page:
|
|
and an initially empty canvas:
|
|
The image is drawn onto the canvas using ctx.drawImage(img, 1, 1);.
In this case, the 1, 1 refer to XY coordinates, starting in the top left hand corner of the canvas. I added the surrounding <div> as a way to ensure there is always a border around the image.
Global Events
There are some event handlers defined:
|
|
Global event handlers are discussed here.
The official event handler documentation is here.
In my case, my customized event handlers only apply to the <canvas> element. These are used to manage the custom behavior of dragging a shape from one position to another, or resizing a shape if its handle is grabbed.
Coordinates
Most of the JavaScript logic is concerned with detecting if a shape or handle has been selected (clicked on) and then handling that shape (creating, moving, resizing and deleting it). I have tried to break that logic down into small functions, to make the code readable.
It’s mostly just geometry to manage a shape’s coordinates.
The one less obvious piece is how coordinates are determined in the first place, for a given placement of the mouse pointer on the image.
Here is the main function for that:
|
|
In this code, e is a mouse event, and e.clientX is the horizontal coordinate of the mouse’s location within the viewport (the area of the web page currently being displayed). And the equivalent vertical location is obtained from e.clientY.
Given the image is not located at position (0, 0) in the viewport, we need to translate the mouse’s coordinates to their position relative to the image.
This is what getBoundingClientRect() lets us do. For the given element (in our case, the canvas), this returns an object which describes the location of the canvas within the viewport.
This is described in detail in the official documentation, but the following diagram provides a clear summary:
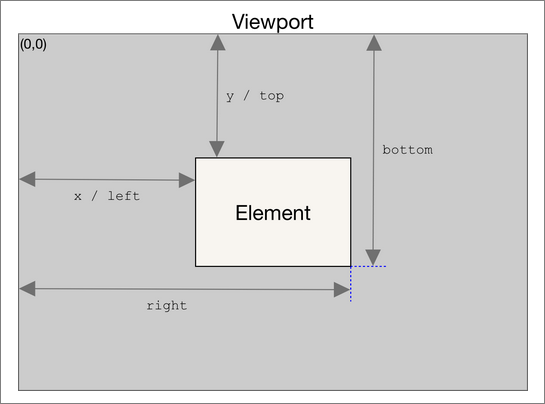
With all this data we can translate the mouse’s viewport coordinates to its image coordinates.
Displaying Our Shapes
The notes in this section relate to the second demo: Canvas Rollover Shapes.
The idea is that the functionality in the first demo allows a series of shapes to be saved for a specific image. In my case, these shapes are saved to a database, and the person who created the shapes also associates them with a new URL leading to additional information about the selected area of the image.
Later, this data is retrieved by a user who wishes to explore the different areas of the image. In the second demo, the previously saved shapes are retrieved, providing rollover areas.
However, these shapes are initially invisible.
Much like an image map, the user can move their cursor over the image. When the cursor rolls over an area, that shape becomes visible (and can be clicked) - again, much like an image map.
In addition to this, links are provided under the image which list the available shapes for an image. This is a convenience. It takes the guesswork out of finding all the (invisible!) shapes available for an image.
The set-up for this demo is very similar to the first demo - but the overall logic is simpler, since there is no drawing, dragging or resizing of shapes.
The biggest difference is here:
|
|
The mousetgt class is used to indicate when the mouse is hovering over any of the links associated with a shape. Each of the links contains a custom HTML attribute - such as data-idx="1" - tying the HTML link back to a specific shape.
Final Notes
At some point in the future, it may be nice to support polygons, instead of only squares and circles. That would require a fairly different/extended approach from the one currently being used, I think.
Timings
One potential problem: When using this approach of painting an image onto a canvas and then executing JavaScript on the result, you need to ensure the image is fully loaded before running the JavaScript. Something like this:
|
|
The key point is if (height === 0 || !complete) { ... }.
You can see more details here.